Manhole
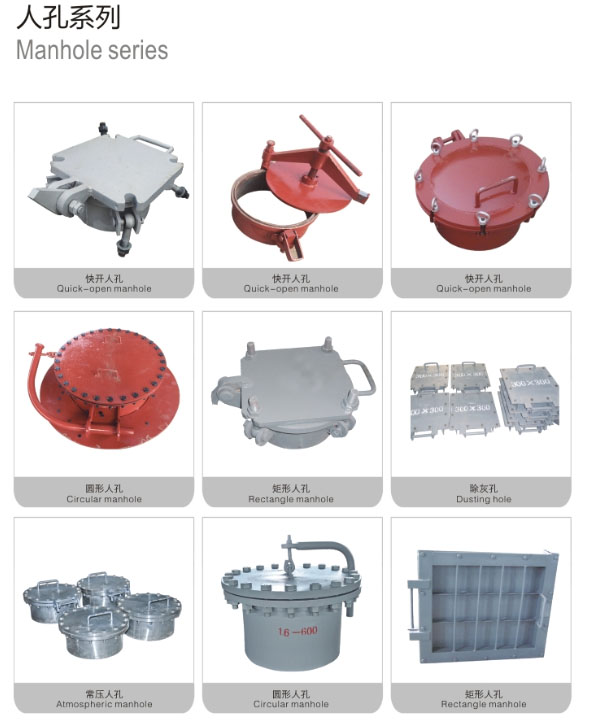
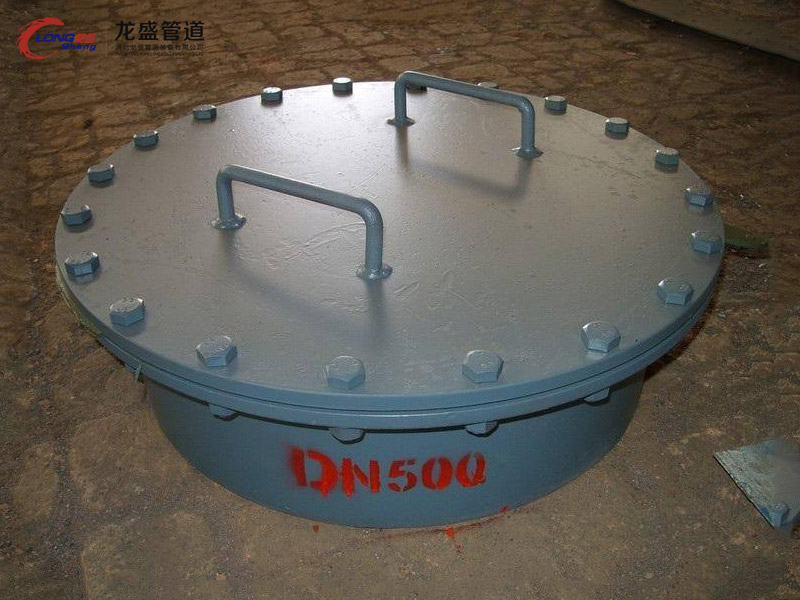
| Product description | Manhole refers to the opening structure used for personnel to enter and exit equipment for installation, maintenance and safety inspection. It is mainly composed of short tube section (or short tube), flange and manhole cover with handle. For safety inspection considerations, the number of manholes required to be opened for pressure vessels and their minimum dimensions are shown in "Inspection Holes". The manhole materials are carbon steel and stainless steel. Manholes are divided into normal pressure and pressure manholes according to pressure conditions; manholes are divided into round, oval and rectangular manholes according to their shape. Rectangular manholes are only suitable for atmospheric equipment; manholes are divided into horizontal according to the installation position Manholes are installed vertically; the fixing methods of manhole covers include rotating cover and hanging cover; the speed after opening of the manhole has ordinary and quick opening. The structure and size of manholes are generally standardized. Please refer to the relevant manual for selection or design. |
|
Main processing technology |
Raw materials enter the factory → material re-inspection → blanking → heating → die forging → removal of residual material → machining → heat treatment → precision machining → surface treatment → finished product inspection → label protection → stocking
(Note: After processing stainless steel → pickling passivation process)
|
|
Product specifications |
DN15-DN4000 |
|
Pressure |
Class150-Class2500 PN0.25Mpa-PN25.0Mpa |
|
Material range |
Q235, 20#, 20G, 201, 304.316.316L.0Cr18Ni9.321.202, carbon steel, stainless steel, alloy steel and aluminum. |
|
Sealing surface |
Raised surface (RF) full plane (FF) concave and convex surface (MFM) tongue and groove surface (TG) |
|
Standard |
National standard, American standard, German standard, Japanese standard and other customized production according to customer standard requirements |
|
Brand |
Xin Zhongran TSZHONGRAN |
|
Mark |
Stencil |
|
Package |
Pallet or wooden box suitable for product size |
|
Payment |
Wire transfer, acceptance, online banking remittance, cash, etc. |
|
Main equipment and tooling guarantee |
1. Two forging hammers (plywood type)
2. Two punch presses (plywood type)
3. Friction press: 150T one
4. Coal-fired heating furnace: 4m2 each
5. Oil heating furnace: 4m2 each
6. Heat treatment and auxiliary equipment (same as other pipe fittings)
7. Machining equipment: ①Lathe: 60 units under 50 50 6 units Vertical lathe: 1600 2 units 3200 1 unit
②Drilling machine: one Z3132α
③Drilling machine: one Z3125
160 sets of matching molds of various specifications
|
1.2 Material selection
The blank selection of the flange material should be based on the actual situation and the forging ratio after the flange is formed, and the forging blanks of different specifications should be selected, and the blanks should be calculated according to the principle of constant weight. And issue the craft card.
1.3 Material inspection
a、Before entering the factory for inspection, the surface of the material is mechanically derusted with a steel wire brush angle grinder.
b、Surface size inspection, surface and size inspection of materials after rust removal.
c、Material analysis or spectrum analysis is performed according to the heat number to determine the element content and performance test.
1.4 The traceability identification of the material is clear. In the manufacturing process, the heat number, batch number, length of the raw material, the number of the material after being rolled into a straight seam tube, the length of the material used, the location of the material used, etc., the transplantation of the material should be traced.
2、Product processing
2.1The material is according to the user's specifications. For the blanking of stainless steel materials, it is best to use a gantry band saw for cold cutting and blanking. Plasma and other thermal cutting methods are not suitable to cut the material to ensure that the waste of materials is reduced and the fracture or heat affected zone is avoided. The metallographic structure changes; to prevent defects such as hardened layer or cracks caused by improper operation in the cutting process. After cutting, polish the port with a grinding wheel grinder to remove the burrs and corners of the port. The carbon steel material is blanked by oxygen-acetylene flame or sawing machine. During the blanking process, necessary logo transplantation is required according to the specifications and materials of the material, and the geometric dimensions of the broken blanks are inspected piece by piece.
2.2Flange blank forging. For flanges, the qualified blanks are heated in a heating furnace and forged according to the forging process requirements of the corresponding materials. The blanks of large pipe fittings should be forged freely under the clamp hammer. All flange blanks must meet the requirements of Class II forgings and above. Blanks of different materials are processed according to the process card requirements of the corresponding heating temperature and holding time.
2.3Heat treatment of pipe blanks (flange blanks), heat (cold) processed pipe fittings and forged flange blanks according to the heat treatment process of different materials to achieve stress relief, refine the structure, and improve the strength and toughness of the material And other comprehensive performance. The heat treatment process is executed according to the heat treatment process card. The process steps of heat treatment are as follows:
2.3.1Check the various parts of the heat treatment furnace: burner, thermometer, fan, oil pump system, trolley device, furnace door lifting device, etc. should be in normal standby state, and the fuel quantity of the oil depot should meet the heat treatment use.
2.3.2Furnace installation: (1) The workpiece should be about 400mm high, and the arrangement should not make the workpieces press each other. The interval is 150mm to prevent deformation and facilitate cooling and uniform heat dissipation. Layout according to the shape reasonably, and draw a sketch of the layout size, and write the number and make a record. (2) The flange should be leveled on the trolley to prevent deformation of the bent pipe after being heated. (3) Adjust the fire wall so that the flame does not directly spray onto the workpiece.
2.3.3Before ignition, check whether the sand seal of the furnace is good. If there are gaps, use refractory earth or aluminum silicate high temperature asbestos to seal.
2.3.4If the heat treatment furnace is ignited by a cold furnace, half of the fire nozzles should be used (that is, one fire nozzle is ignited every interval. If the furnace is ignited, all the fire nozzles can be ignited. Note that the heating rate, constant temperature, time, cooling method, etc., should comply with the heat treatment process.
2.3.5Adjust the flue valve and nozzle oil supply and air flow to make the temperature of the heat treatment furnace uniform, and the temperature of each thermocouple is equal. The operator records the furnace temperature every 15 minutes.
2.3.6.The operator should frequently patrol, check the operation of the oil furnace, use the observation hole to observe the combustion of the furnace, and adjust the air volume and oil volume of the burner in time when the combustion is not good. If the furnace temperature indicator is in doubt, use an optical pyrometer to compare. Find out the reason and deal with it.
2.3.7Before the workpiece is out of the furnace, close all oil nozzles and dampers, and fill in the "Heat Treatment Process Parameter Record".
2.3.8The normalizing and tempering of the heat treatment can be carried out in two times. For example, when the heat treatment is carried out continuously, the temperature of the elbow must be lowered to 300℃ after normalizing before the tempering can be carried out.
2.3.9The same furnace must only be equipped with flanges of the same material or corresponding specifications.
2.3.10The phase inspection shall not be less than one per furnace; the hardness inspection shall not be less than two pieces per furnace, and each piece shall not be less than 3 points. The detection parts are respectively located on the base material on the tension side, the largest deformation zone.
2.4Machining and forming, according to the specifications and models of different pipe fittings, the blanks are machined and formed by lathes, drilling machines and other machinery according to the corresponding standard requirements, so that the pipe fittings can meet the standard requirements of the appearance and geometric dimensions. The inspection department inspects the products according to the standard geometric dimensions and tolerances. Stainless steel pipe fittings are pickled and passivated after machining is completed, and intergranular corrosion detection is required if necessary.
3、Inspection and test (type test is not undertaken by our company)
3.1Surface Quality
3.1.1There should be no cracks, overheating, etc. on the flange surface, and there should be no hard spots on the surface.
3.1.2The inner and outer surfaces of the flange should be smooth, without detrimental strength and appearance defects, such as scars, scratches, heavy leather, etc. The defects found in the inspection should be polished and removed, and the polished area should be smooth until the defects are confirmed by coloring or magnetic particle inspection So far, the thickness after grinding should meet the specified requirements.
3.1.3The pits on the flange end body whose depth exceeds 3.15mm, and the pits on the weld seam whose depth exceeds 1.5mm are not allowed to be repaired by hammering.
3.1.4Defect repair
The sharp notches and scratches on the pipe body whose depth is less than 5% of the nominal wall thickness should be smoothly ground, and the smooth and isolated round bottom marks do not need to be ground.
3.1.5Any cracks, overburning, overheating or hard spots on the flange are not allowed to repair the defects of the flange pipe body and welding repair is not allowed.
3.2The geometric size inspection is carried out in accordance with the corresponding standard size requirements.
3.3.Non-destructive testing of hot-pressed flanges
3.3.1The non-destructive testing of flanges should be carried out after the flanges are heat-treated. Magnetic powder, ultrasonic, radiographic, and coloring testing methods are commonly used, and non-destructive testing operating procedures are formulated.
3.3.2The equipment used for magnetic particle testing should generate a magnetic field perpendicular to the weld, and its strength is sufficient to show open welding, partial or incomplete fusion, discontinuity, cracks, cracks and scars on the surface of the steel pipe.
3.3.3Magnetic particle testing shall measure the depth of all defects found. When the displayed depth is greater than 5% of the specified wall thickness, the defects must be ground
3.3.4When ultrasonic testing is performed for transverse wave testing, a comparison standard should be used to calibrate the sensitivity of the testing equipment. The comparison standard has the same process, material and specifications as the tested part. The comparison standard should be drilled along the vertical wall thickness direction. For a 1.6mm diameter vertical through hole, if the signal generated by the defect is greater than or equal to 100% of the echo height generated by the 1.6mm diameter through hole of the comparison standard, the defect must be ground. If the signal generated by the defect is a layered defect, longitudinal wave detection can be used. The sensitivity calibration of longitudinal wave detection should have the same process, material, and specifications as the test piece. A Φ6 flat-bottomed hole is drilled on the comparison standard. Test half of the wall thickness of the test piece.
- TEL- +86-15226756063
- EMAIL- czlsg@163.com
- ADD- Yanta Road Industrial Area, Yanshan,Hebei.

